A walk-through guide about how to start using Zeus LDK embedded node and NWC with NOSTR clients, for zaps

 |
|
 |
|
 |
|
 |
|
 |
|
 |
|
 |
|
 |
|
Originally posted on Stacker News on Apr 25, 2026. Updated here Apr 25, 2026
I saw recently a plethora of (STUPID) users jumping on using new Spark wallets for nostr. Their lack of knowledge makes my blood boiling... they simply fall for that Spark crap trap.
I REPEAT: SPARK IS A GIANT TRAP FOR ALL OF US. Please stop falling for that scam.
Now let's get started with Zeus, one of the most complex, complete and powerful wallet apps for mobiles. I usually do not like to "kiss ass" of anybody, you know me well. But we have to agree that Zeus team did a wonderful job with this latest version v0.13 integrating LDK node and CDK. This mini guide is focused for those that want/need a LN wallet for nostr. Let's say you start from ZERO, you just arrived on nostr and want receive / send some sats over zaps.
STEP 1 - Start an embedded LDK node on Zeus
- Once you install Zeus you will be prompted with a wizard questionnaire, helping you to decide which type of setup you want to run. See more about Zeus graduated wallet here.
- You can also choose "Advanced setup" and then select a LDK embedded node. In few seconds your node will be up and running. The sync with LDK is instant.
- We assume you do not have any sats to open or buy a new inbound channel from LSP. No worry, you do not need it in this phase. First we will setup the LN address to receive sats and also the NWC sub-account. Later will be switched to a LN channel, after "graduation".
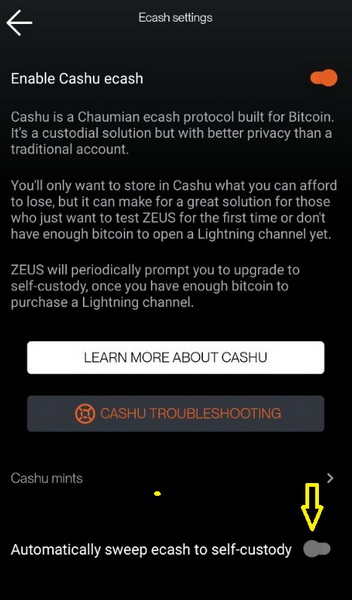
- Go to Settings - Cashu Mints. Add a cashu mint as you wish, following the instructions. This feature will give you the option to receive straight away, without the need to have a LN channel open. For the moment. to start is perfectly fine.
Go to Settings - Lightning Address. Generate one, is random and choose to be linked to cashu ecash account. If you added multiple cashu mints, you will be able to switch to receive between them, in the LN address settings.
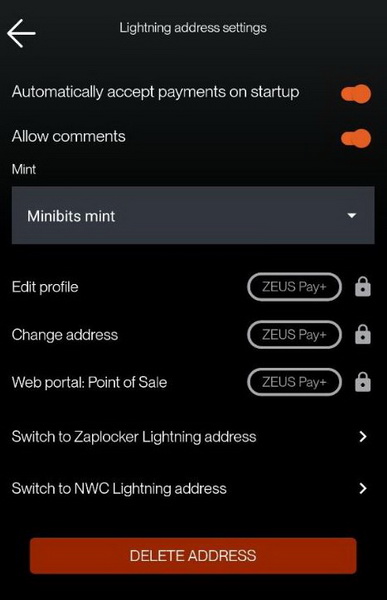
Also for the time being, do not activate the option to "redeem in self-custody", because you do not have a LN channel yet. Later you can be switched ON, from Settings - Ecash options.
Setup the NWC account, go to Settings - Tools - Nostr Wallet Connect service. Do not click right away on the "+" button. First setup the NWC to use the cashu wallet, because you do not have yet a LN channel with a decent balance.
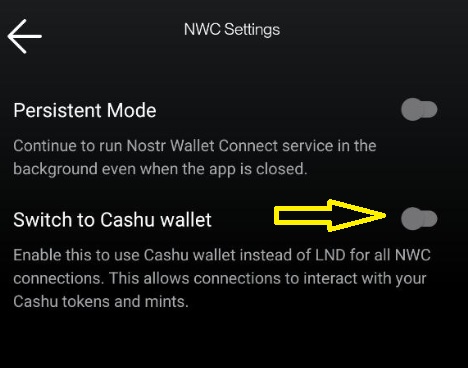
If you want to use regularly, almost all the time, you can switch to "persistent mode" for NWC service. But if you use it just few times sporadically is not really necessary, just open Zeus before you want to zap somebody and wait few seconds for NWC service to reconnect.
REMINDER:
Keep in mind that if want to use Zeus in full "persistent mode" all the time (without opening the app) and be able to zap anytime and receive payments, you also need to set the LDK/LND node in "persistent mode" to keep alive the connection.
To set the LDK node in persistent mode, go to Settings - Embedded node - set persistent switch ON. That option will keep alive the node service even with Zeus app closed / in background / screen off.
Now, let's go back to NWC account settings and in options screen put the name of the account and select "Custom". Switch off the option "pay invoice". This selection is ONLY when you do not have enough balance or you just start from 0.
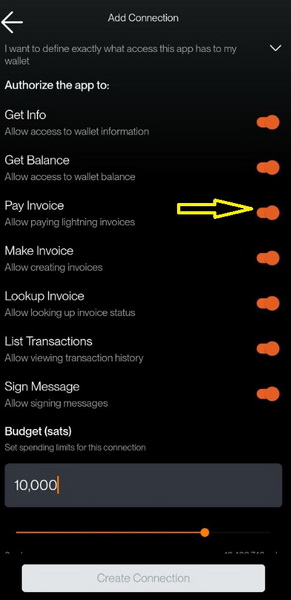
Put a desired spending budget and click on "create connection" button.
Now, once is created the NWC connection, go back to edit it (is a small tag on the top corner) and switch ON the option for "pay invoices". Set accordingly the budget limit.
You will be prompted with a QR code to scan and connect an external wallet or copy the string and save it for later. You can copy that string and paste it in whatever nostr client in their wallet connection and be able to send sats right away for testing.
Later, when you have a LN channel, you can switch from cashu wallet to the LN channels balance and the NWC will use that balance, not the cashu.
- Set your Zeus LN address in any NOSTR client and start receiving zaps. That LN address can be used anytime to receive, even when your Zeus is not online. It uses a cashu mint as "buffer zone" and you can redeem the tokens anytime you want.
To redeem your received zaps, once you open Zeus you will see a Zeus icon on top left blinking. That means your LN address is syncing possible received zaps. Go to Settings - Lightning Address and you will see them all listed. Click on "redeem" button and in few moments all tokens are moved to your cashu wallet.
Later you can swap them into self-custody, when you will have a LN channel available with enough inbound liquidity. For the time being, just accumulate more, enough to lease a proper inbound channel from the LSP.
That's it for this step 1, accumulation of sats.
STEP 2 - Upgrade to self-custody and NWC
Let's consider that you accumulate enough sats to start with a new LN channel, usually 10k sats are enough to buy a decent size of an inbound channel. For starters I recommend to use Zeus LSP - Olympus, in app option to buy a new channel. For starters, 100-200-300k sats channel is OK. For advanced users, I would recommend to start with min 1M sats channel so you will have it for long run and bigger amounts.
You can open channels also with your own funds from onchain and with any other peer, there's no limit to use only Olympus LSP. But for starters is much better to start with a LSP channel, to get comfortable and have full support from team.
Read more about types of private channels here and how to use them.
In order to receive straight away into self-custody, you need to have an "empty channel", an inbound channel. I've explained here (for newbies) how LN works in a simple analogy, please read it.
To buy a new inbound channel (empty channel), on the main screen, click on the bottom icon for channels screen. In there, on top right you have the "+" button. Once you click it, you will be prompted with 3 options:
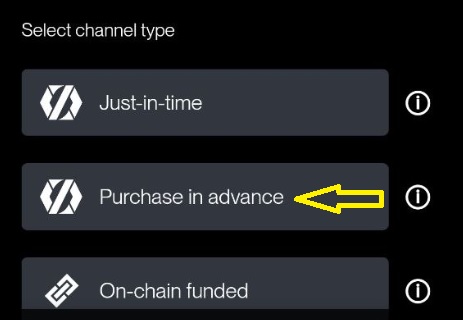
Select "purchase in advance" and follow the instructions. You can pay the LSP invoice with existing balance from your cashu wallet or any other LN wallet. Then after the first confirmation block your channel will be ready. Now you can receive right away into self-custody LN channel.
- If you want to redeem the ecash tokens straight into self-custody LN channel, then go to Settings - Ecash and set the switch ON for "automatically seep ecash to self-custody". That will swap instantly all the tokens you receive through your LN address into your LN channel.
You can also let it to accumulate into cashu wallet and later make the swap manually, anytime.
OPTIONAL:
To make the swap manually from cashu tokens into sats in self-custody you have to do these steps:
- swipe in the main screen the cashu wallet box to ther right and select "Send ecash".
- select the mint(s) if you have multiple one, from which you want to sweep amd put the amount. Optional you can lock to your nostr key generated into your Zeus wallet.
- once you click send it will create a QR token with the amounnt of sats you set.
- click on redeem to self-custody and in few moments the swap will be done, with a small fee incurred.
Aaaand done! That's it the process, you can repeat it over and over. Keep in mind to swap out into onchainn from your full LN channels, whenn is needed. You can use the Zeus integrated swap services. Reminder: you can switch to multiple swap providers in the swap settings:
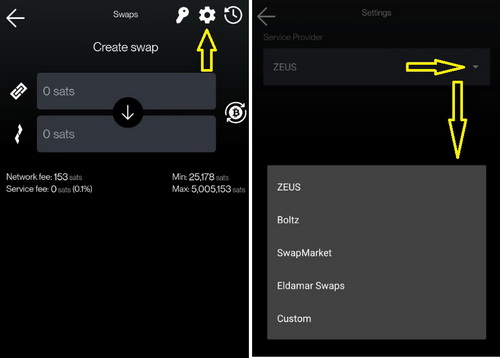
You can swap out to any onchain address or to the same Zeus node onchain wallet address.
In this way, with a LSP inbound channel, you can re-use it over and over and pass infinite amount of sats through that channel, without leaving onchain trace or having to maintain channels liquidity, rebalancing etc. This is a PRIVATE channel, you take care only when is full. Remember my explanation about LN analogy.
Thank you for your attention in this matter.
If you want to test it, now you can zap this guide to my Zeus LN address: adventuroustortoise06@zeuspay.com