A step by step guide for podcasters that want to have fun with sats on their video live podcast. Viewers drop sats and interact with funny animations, live
 |
|
 |
|
 |
|
 |
|
 |
|
 |
|
 |
|
 |
|
Originaly posted on Substack on Jan 14, 2023. Updated here on Dec 28, 2024.
I've seen lately many podcasters live on YouTube or other video platforms, but very few are really adopting Bitcoin, in form of tips, contributions, fun animations activated with donations with sats over Lightning Network.
So I wonder, maybe they do not know how to setup a simple solution for this. And here I would like to present them a simple guide, step by step, with zero cost, but with huge potential:
viewers could see that you accept Bitcoin over LN, create attention to Bitcoin
- viewers would have a fun response / reward for their humble donations and contributions
- if you want you could even organize a live crowdfunding campaign
- make more interactive your live show
- and not the last one: MAKE BITCOIN ADOPTION TO BE FUN
So here is a quick guide how to install, configure and run a LNbits instance ON ANY PC WITH LINUX and setup the Streamer Copilot LNbits extension. You can use it with any streaming platform you normally use (ReStream or OBS Studio).
STAGE 1 - INSTALL LNBITS
-
If you do not have a LinuxOS machine ready, I suggest to take whatever old laptop or PC with min 4GB RAM and install DebianOS on it (or whatever other Linux you want). I prefer Debian because is pure Linux, clean, fast, no bullshit and is the most compatible with all repositories. Set a static local IP for that machine. Install ufw firewall and open the port 443 in it.
sudo apt install ufw
sudo ufw allow 443
Open port 443 (https) on your router and forward it to your local machine IP that host your LNbits instance.
- Install LNbits using poetry method. Are just few lines copy/paste, no need to be a super linux coder to use them. Any windoze user could do it :) Do not start yet the lnbits! Must be configured first.
- Use caddy option to configure the https access to your LNbits. Is the most easier method and clean. Use a subdomain for your LNbits instance like lnbits.mydomain.com or bank.mydomain.com or whatever.mydomain.com
- o to your domain admin web and edit DNS records to contain A record for your lnbits.mydomain.com for the IP you have on your router. If you have dynamic IP, you could use any DynDNS app to configure it using CNAME in your DNS.
- Edit LNbits .env file and activate the adminUI extension so you could manage it directly in browser.
- Start LNbits with the simple command "poetry run lnbits" (run in lnbits-legend folder) and in the startup console you will see the link to the adminUI. Copy and paste into your browser and start configuring your LNbits.
- You will have to setup: funding source, users, authorized users to access your LNbits. Is good to limit the public access only to the users you create them.
- As funding source, if you do not run your own LN node (that you can link it to your LNbits), you can use many simple funding sources like: lntxbot, lntipbot, lnpay.co, openNode.com etc. With LNPay.co it is very easy to setup and they have good liquidity servers, you can open a free account if you do not have too much traffic. Just for this scenario is enough. Later you can switch the funding source anytime you want.
- If you do not want to keep the funds in these custodial funding sources, you can setup the LNbits extension Scrub and forward all the sats automatically to an external address. Or do it manually when you consider is the proper time. But anyways, use these custodial funding sources as testing playground, not for production cases. You can change the funding source anytime from adminUI, without any other changes in your LNbits or affecting the configuration and wallets.
- Done! You have a running LNbits, now can create users, lndhub wallet accounts, and activate the extension you need for each user. I suggest to start activating these extensions: lndhub, lnurl-pay, lnurl-withdraw, streamer copilot, Scrub and all other you want / need. There are much more things you can do with LNbits and really interesting.
- Do some testing with your LNURL-p to see if is working to receive correctly.
More about getting started with LNbits and how to manage it, here is a detailed guide and here an optional guide explaining multiple methods how to run a LNbits instance.
See here more video tutorials how to setup users, extensions etc.
STAGE 2 - CONFIGURING STREAMER COPILOT
OK, now you have a working LNbits as a backstage for your streaming podcast. Let’s see how to configure the extension Streamer Copilot to work with your streaming platform. Is practically just an added animation on your video feed, linked to LNBits.
Here is a video tutorial made by Ben Arc (LNbits dev) about Streamer Copilot.
Create the Copilot
Go to your LNbits main dashboard. If you already created a dedicated user (with his own wallet) for this setup, enter to its own user dashboard. You can use also the main admin user with many different wallets. It’s up to you how to organize it.
Then go to “Manage Extensions” - find “Streamer Copilot” and click “activate”. Then click “Open” and enter into Streamer Copilot extension dashboard.
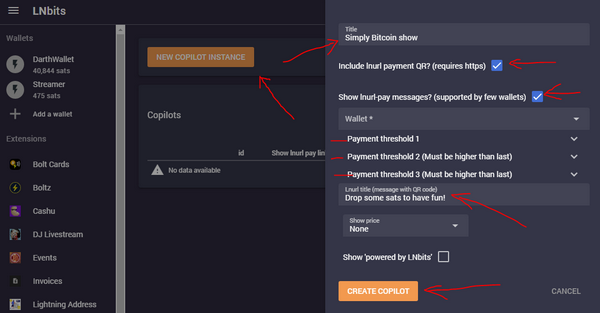
We are going to create a new copilot, put a title, select the box for the payment QR to be displayed on the screen. It will appear the levels of tips and each one can be configured to display a set of animations based on the amount tipped.
You can activate also the box to display LNURL messages. Viewers can send messages together with the LN tip. More fun!
Select a LNbits wallet from the drop-down box. Is good to use a dedicated one. In LNbits you can create many lndhub wallets.
Put a title to be displayed under the QR code. If you want to activate the “price box”, it will display the total amount accumulated from tips.
Then click create copilot. Done. Is ready to be inserted into your live stream.
Test the streaming copilot

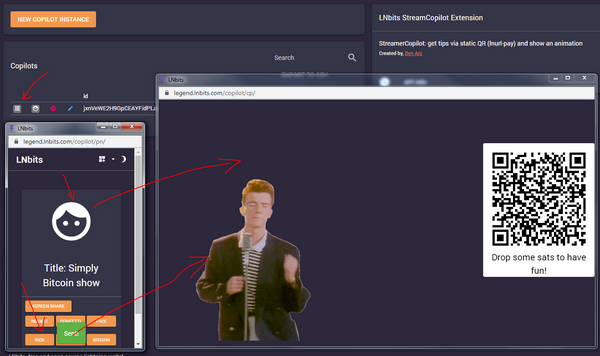
Click on the panel icon from the list of copilots.
Will popup a small window with the copilot controls for testing. Click on the copilot face and will open a window where you will see the video camera feed with the QR code overlapping.
Test some actions and see how the animations fit into your feed. Done!
For the moment are only few to select, but soon we will have options to add more gifs and animations. Also option for a floating QR image, that can be moved where you want to fit better on your stream video.
Link Streamer Copilot to your streaming platform
Keep your LNbits streaming windows open and open OBS studio (or any other streaming platform).
In this example we will use OBS Studio, an open source streaming platform and free.
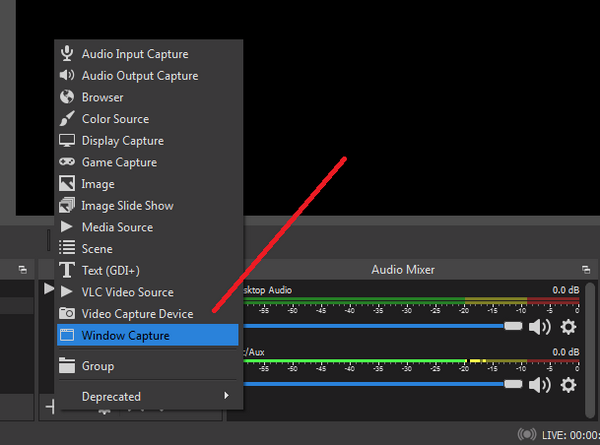
Go to OBS studio dashboard and click on “sources +” - select “Window capture”.
In the window properties, select the window open from LNbits copilot and save the settings. You will see in the main OBS dashboard the video feed, with the QR image.
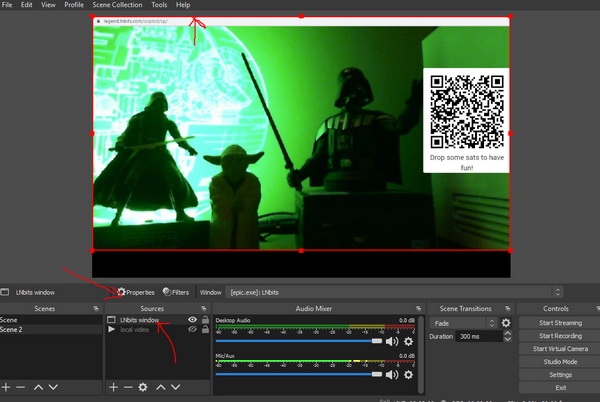
You can click on “source” properties if you want to make changes.
Arrange the video feed as you wish, I suggest to move it a slightly up to hide the URL of the LNbits window. Make it bigger or smaller to fit in your streaming window.
Keep in mind that OBS will bring as “active selected window” the last browser window you select. So if you use in the same time multiple tabs be sure to keep selected the streamer window.
Go to the right controls panel and click on “settings”.
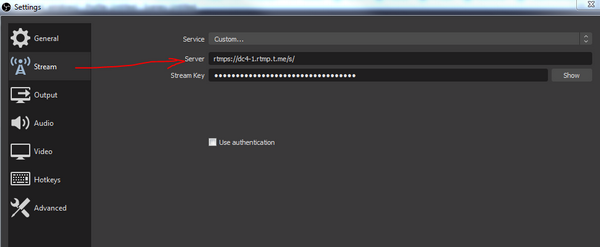
Select the “Stream” option and put all the details about your streaming destination.
It could be any live video service (Youtube, Rumble, Twitch, Telegram etc). So you will have to take the server link and key from their setup account and put it into OBS stream settings.
Save and go to the right controls panel and click on “Start Streaming”.
Now you can use that stream on any other platform like Youtube, Twitch, Rumble, Telegram, whatever...
How to broadcast with Telegram
Simple steps how to broadcast a LNBits streamer session in a Telegram Channel.
Let’s say you have a Telegram group or channel and you want to show a LNbits streamer copilot window and members of that group could send sats, during the audio/video session.
Go to Telegram group and click on top icon for "streaming with..." (you must be owner of the group, otherwise is not active).
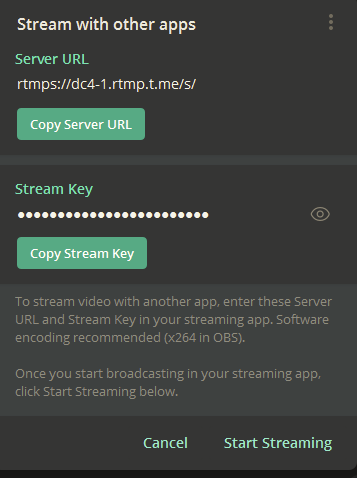
Copy server URL and stream key and paste it into OBS streaming settings

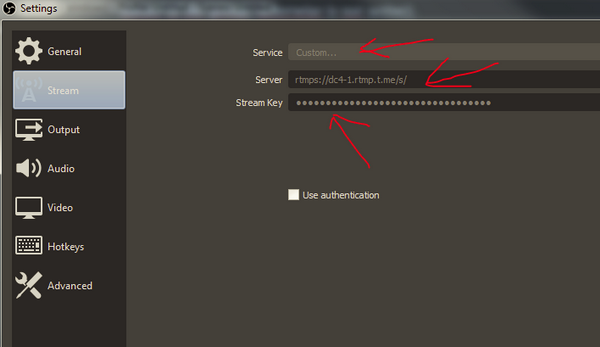
Close OBS stream settings and click on start streaming, in OBS and in Telegram.
Done, after few moments you will see the video streaming.
This can be applied with any media source, even if is live or recorded.
Members of the Telegram group can watch it anytime, even in loop.
ENJOY STREAMING!
Done! Now your video feed with LNbits copilot will be streamed. All viewers can see and interact using the LNURL QR code displayed and see all the animations triggered by their payments to the QR code in real time!
All the payments goes straight to your LNbits wallet (into your funding source actually).