A walk-through guide how to start using a powerful LND node on your mobile device with Zeus LN embedded node
![]()
 |
|
 |
|
 |
|
 |
|
 |
|
 |
|
 |
|
 |
|
Originally posted on Substack on Feb 05, 2024. Updated here Nov 10, 2025
This guide is a celebration of 5 years of existence of Zeus LN app, its first release v0.0.1 was on Feb 19 2019, 5 years of continuous improvements and dedication to self-custody FOSS app for bitcoiners. An amazing journey for a very powerful mobile app, that deserve its place on top of the Bitcoin builders. I could say that you are not a real bitcoiner if you do not have installed Zeus on your mobile device. Thanks to Evan Kaloudis !
I dedicate this guide to all those new Lightning Network (LN) users that want to start a new sovereign journey using a self-custody node wallet on their mobile devices.
Let’s consider that you already pass through all that plethora of custodial LN wallets, but you are not ready yet to start running a PUBLIC routing LN node, you just want to stack more sats over LN in a more self-custodial way and make your regular payments over LN.
Here comes Zeus, starting with version v0.8.0 announced on their blog, is offering now an embedded LND node into the app. Until now Zeus was a remote node management app + LNDhub accounts. But now… the node is in the phone!
If you want to see more details about the Zeus remote node management, please start with this very good video tutorial from BTC Sessions.
Quick recap of main features for Zeus Wallet app:
- Private LND node - That means this node will NOT do public routing of others payments through your node. The node and the channels are unannounced (private, not visible on the public LN graph). To receive and make payments will be done thorough your connected LSP peers. REMEMBER: Zeus Embedded Node will NOT do public routing!
- Remote access to your home LN node - together with the embedded LND node you can still access a remote LN node (LND, CLN).
- Multiple LNDHUB, NWC accounts - optional you can link multiple lndhub or NWC accounts and use them as any other LN wallet.
- Persistent LND service - user can activate this feature and keep the LND service active continuously as any regular LN node. The app doesn’t have to be open, the persistent service will keep all the communication online.
- Neutrino block filters - block sync is done using block filters and the Neutrino protocol (given no information about our users' on-chain funds). Reminder: for high-latency / slow internet connections this block sync based on neutrino, sometimes could fail. Trying to switch to a near neutrino server could help restore the sync. Without this sync your LND node could not start!
- Simple Taproot Channels - When closing these channels, users are incur less fees and are given more privacy as they appear to like any other Taproot spend when examining their on-chain footprint.
- Integrated LSP - Olympus is the new LSP node for Zeus. Users can reeceive sats over LN straight away, without having previously set up LN channels. Simply will have to create a LN invoice and pay from any other LN wallet, with Zeus 0-conf channel service. Read more about Zeus LSP here. The LSP also provides added privacy to our users by providing them with wrapped invoices that conceal their nodes' public keys from payers.
- Contacts Book - you can save manually contacts or import from NOSTR, for easy send payments to your regular destinations.
- Full support for LNURL, LN Address send and receive - now you can setup your own self-custodial LN Address with @zeuspay.com. Reminder: You can also use Zeus for LN-auth on sites where you can login with a LN authentication. Is very handy.
- Point of Sale - Now merchant users can setup their own product items and sell directly from Zeus, with integrated PoS. For the moment contain basic needs but in the future will contain extended features.
- LND logs - user can read in real time the LND service logs and use them to debug possible issues (mainly for bad connections)
- Automated Backups - the LN node channels are automatically back up on the Olympus server. This automated backup is encrypted with your node wallet seed (without the seed is totally useless). User also can export manually a SCB (static channels backup) for a disaster recovery.
- Ecash cashu wallet - together with the embedded LND node you can have also a cashu wallet, that can be used without any LN channnel open.
- Swap service onchain / LN - now you can use multiple swap services inside Zeus, anytime you need to refill an emptied channnel or swap out into onchain acummulated cashu tokens.
How to get onboard with Zeus LN Node (LND embedded)

In this guide I will talk only about the embedded LND node, and not about the other ways to use this magnificent app (remote node management and LNDhub accounts). For the other types of connections, please refer to Zeus Docs page, that is very well explained and no need for writing a dedicated guide.
STEP 1 - INITIAL SETUP #
Due to the fact that Zeus is a full LND node I will have some initial recommendations:
- Do not use an old device, that could affect the use of this powerful app. Especially in the period of sync the app could use intensively the CPU and RAM. The lack of these could even make impossible to use the Zeus app.
- Use at least Android 11 as mobile OS and updated as much is possible. For iOS the same, try to use a much higher version of OS.
- You will need at least 1GB disk space for the data storage. In time could grow more, but there is a functionality to compact the database to a level of MBs.
- There’s NO need to use Zeus with Tor or Orbot service. Please don’t complicate things more than is necessary. Tor in this case will not offer you more privacy but only make things worse for the initial sync. Also be careful with what VPNs you are using it and check the latency of the connection towards neutrino servers. Keep in mind, Neutrino block filter do not leak or trace your device identity, are just serving blocks. The LN traffic is also behind a LSP with private channels so very few information is out, there’s no reason to freak out about privacy.
- Have patience for the initial sync, could take several minutes. Try to be connected to a broadband internet connection with good latency. If you run your own Bitcoin node, you can activate the neutrino service and connect your Zeus to your own node, even using the internal LAN, so you will have a maximum speed.
Once you setup the type of connection “Embedded node” the app will start syncing for a while. Wait patiently to finish that part, then enter in the main Settings page.
Briefly, let’s dive into each of the Settings sections and understand some of the main features, before you start using Zeus:
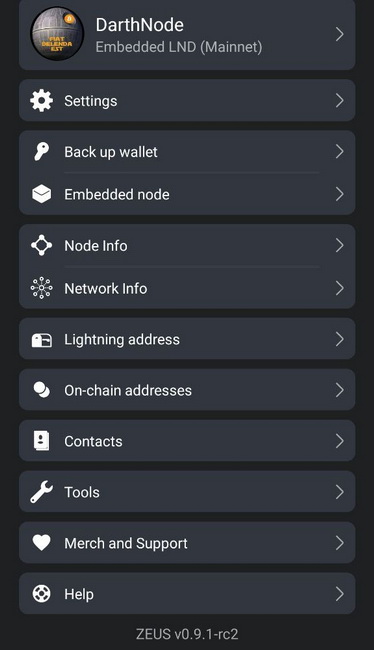
A - SETTINGS
This is a section with general settings for the entire app
1 - Lightning Service Provider (LSP)
Here are presented two LSP services:
- Just in time channels - when you do not have any channel open or inbound liquidity available, if the service is activated it will open a channel on-the-fly for you. This option can be disabled if you do not want to open more channels of this type.
- Request channels in advance - you can buy inbound channels from the Olympus LSP directly in the app with multiple options and amounts (for inbound and outbound).
The LSP helps connect users to the Lightning network by opening up payment channels to their nodes. Read more about LSP here. ZEUS has a new LSP integrated into it called OLYMPUS by ZEUS, that is available to all users who use the new embedded node.
In this section, by default is the Olympus LSP (https://0conf.lnolymp.us), but soon you can also set another 0conf LSP that support this protocol.
Keep in mind:
- when you open a channel with Olympus LSP using the wrapped LN invoices you also obtain a 100k inbound liquidity ! This is really good option in case you need to receive straight away more sats.
- Example: you deposit 400k sats to open a LSP channel, then the LSP is opening a 500k sats capacity channel towards your Zeus node and push the 400k sats you deposit towards your side.
- “Inbound liquidity” = more “space” in your channel to receive.
In the future we hope we could have many other LSP that could be integrated into Zeus and use alternatively each one. Is just a matter of time until new LSPs will adopt an open standard for these kind of 0conf channels.
If you do not want to open new channels “on the fly”, you could disable this option.
In this same section, you have also the option to choose for “request Simple Taproot Channels” when the LSP will open a channel towards your Zeus node. These Simple Taproot Channels offer up better on-chain privacy and lower fees on channel closing. There are only two reasons you wouldn't want to use them:
- They are new, and there still may be bugs in LND when using them.
- Your counterparty doesn't support them. Even LND nodes have to explicitly opt into them, for now.
2 - Payment settings
This feature will offer you the way to set your own preferred fees for payments, over LN or onchain. Also provide the option to increase or decrease the timeout for your invoices.
If some of your LN payments fail, you could increase the fee to find a better route. Also if are doing onchain txs, you can setup a specific fee so your tx could not end up stuck in the mempool for long time, in case of high fees period.
3 - Invoices settings
In this section are some options to generate invoices:
- Set a standard memo to be displayed in the invoice you generate
- Expiration time in seconds, in case you want specific time, longer or shorter for your invoice to be paid
- Include route hints - provide information to find non-advertised, or private, channels. This allows routing of payments to nodes that are not publicly visible on the network. A routing hint provides a partial route between the receiver's private node and a public node. This routing hint is then included in the invoice generated by the receiver and provided to the payer. I suggest to have it enable by default, otherwise incoming payments could fail (no route found).
- AMP invoice - Atomic Multi-path Payments are a new type of Lightning payments implemented by LND that allow to receive sats without a specific invoice, using keysend. Is practically a static payment code. Read more here.
- Show custom preimage field - use this option only in very specific cases when you really want to use custom fields in the preimage. Read more here.
Another option in this section is how to set the type of onchain address you want to use: segwit nested, segwit, taproot.
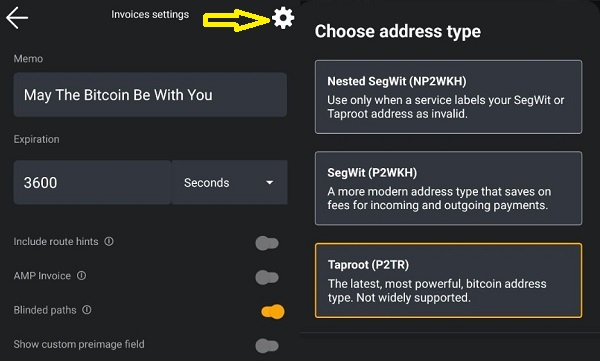
Click on the top wheel button and a popup screen will appear to choose the desired type of address. Once you set that, the next time you hit the receive button for onchain, it will generate the address type selected. You can change it anytime.
4 - Channels settings
In this section you pre-set some opening channels features like:
- number of confirmations
- Announce channel (by default is off), that means it will be unannounced channels
- Simple Taproot Channels
- Show channel purchase button
5 - Privacy settings
Here you will find some basic settings to add more privacy using Zeus app:
- Block explorer to open tx details (mempool.space, blockstream.info or custom personal one)
- Read clipboard - on/off toggle if you want Zeus to read your device clipboard
- Lurker mode - on/off toggle if you want to hide specific sensitive info from your Zeus app. Is a good option when you make demos or screenshots.
- Mempool fee suggestion - activate this option if you want to use recommended fee levels from mempool.space
6 - Security
This section have only two options for securing the app at opening: set a password or a PIN.
Once you set a PIN to open the app, you also be able to set a “duress PIN”. This secret additional PIN will be used ONLY in case of duress situation, if you are threaten. If you put this PIN, the configuration will be all WIPE OUT. So you better keep updated your backups. Automated backups are ON by default, but is good to have your own backups too, out of the device.
7 - Currency
Enable or disable the option to display a fiat currency conversion in the Zeus app usage. Currently is supporting over 30 worldwide fiat currencies.
8 - Language
You can switch between multiple translation languages, reviewed by Zeus community with native speakers.
9 - Display
In this section you can personalize your Zeus display, selecting various color themes, default screen (keypad or balance), show your node alias, activate big keypad buttons, show more decimal places.
10 - Point of Sale
This is a special feature to enable / disable an integrated PoS system into Zeus. You could run a standalone PoS or linked to a Square PoS system. Currently is supporting basic functionalities as a PoS, but enough for a good start and could help those small merchants (bars/restaurants, groceries) to start accepting BTC in a native way.
Inside this settings, you will find various options to setup your PoS:
- Confirmation payment type: LN only, 0-conf, 1-conf
- Enable / disable tips for employee that operate the PoS
- Show / hide keypad
- Tax percentage to apply on the ticket
- Create products and categories of products
- A simple listing of all sales
Here is a live demo video how to use Zeus PoS:
B - Backup wallet
The embedded node in ZEUS is based on LND and uses the aezeed seed format. This is different than the typical BIP39 format you see in most Bitcoin wallets, although it may appear to be similar. Aezeed includes some extra data including the birth date of the wallet that will help re-scans during recovery happen more efficiently.
The aezeed key format should be compatible with the following mobile wallets: Blixt, BlueWallet and Breez. Note that the seed alone will be insufficient to recover all your balances if you have open or pending closing channels !
Learn more about the backup and restore process on Zeus Docs page.
POWER ADVICE: When you save your seed, please save also the node pubkey! Sometimes is good to have it at hand, together with your seed and SCB (Static Channels Backup) in case you need to verify the recovery.
SCB is necessary only if you have LN channels open. In case you have only onchain funds, is not necessary.
If you see that after a long time is still not showing the old history txs, go to Embedded node - Peers and disable the option to use the list of selected peers (by default is the btcd.lnolymp.us). That will trigger a restart and will connect to first available neutrino node with a better time response. Or use the bellow mentioned other well known neutrino peers.
If you want to see more recovery options for a LND node, please read my previous guide, where you can find the steps how to import an aezeed seed into Sparrow wallet or other methods.
C - Embedded Node
In this section we will find some basic tools to manage the integrated node:
- Disaster Recovery - Automated and manual backups for the LN channels. Please read more how to use this feature on Zeus Docs page.
- Express Graph Sync - Zeus app will download the LN gossip data graph from a dedicated server, for faster and better synchronization, offering best payment paths. You can choose also to clear previous graph data at startup.
- Peers - section to manage the neutrino peers and 0-conf peers. If you have issues with initial sync, channels not coming online, is because your device have high latency with the configured neutrino peer. Try switching of the list of preferred peers or add your specific peer that you know it have better latency for sync. Well known neutrino servers are:
- btcd1.lnolymp.us | btcd2.lnolymp.us - for US region
- sg.lnolymp.us - for Asia region
- btcd-mainnet.lightning.computer - for US region
- uswest.blixtwallet.com (Seattle) - for US region
- europe.blixtwallet.com (Germany) - for EU region
- asia.blixtwallet.com - for Asia region
- node.eldamar.icu - for US region
- noad.sathoarder.com - for US region
- bb1.breez.technology | bb2.breez.technology - for US region
- neutrino.shock.network - US region
- LND logs - very useful tool to debug your LN node issues and control in depth what is going on with a more technical level.
- Advanced settings - more tools to control the use of your LND node:
- Pathfinding mode - bimodal or apriori, ways to find a better route for your LN payments and also resetting the previous routing information. Please read these very good guides about pathfinding: Pathfinding - by Docs Lightning Engineering and LN Payment Pathfinding - by Voltage
- Persistent LND - activate this mode if you want the LND service to run continuously in the background and keep your node online 24/7. This is very useful if you use Zeus as a PoS in a small shop or you are receiving many LN tips over the LN Address.
- Rescan wallet - this option will trigger at restart a full scan of all onchain txs of your wallet. Activate it only in case you are missing some txs in your wallet. The rescan task will take time, several minutes so be patient and always check the logs to see more details about the progress.
- Compact Database - this option is very useful if your Zeus app is occupying a lot of device space (see app details in your device settings). If you have a lot of activity using Zeus, I would recommend to do this compaction more often. Once you see that you have more than 1-1.5GB data for Zeus app, do the compaction. It will restart and take some time, so be patient.
- Delete Neutrino files - this option to delete the neutrino files (with a restart) will reduce a lot the data storage usage. Reducing the data usage also have a big impact in battery use, reducing the battery use, especially if you use Zeus in persistent mode.
D - Node Info
In this section, you will find more details about the status of your Zeus node as:
- Alias - short node ID
- Public Key - the full public key for your node required for other nodes to find that path towards your node. Remember that this pubkey is NOT visible on the regular LN Explorers (Mempool, Amboss, 1ML etc). This pubkey is reachable ONLY through your connected LN peers and channels.
- LN implementation version
- Zeus app version
- Synced to chain and Synced to graph status - very important ones, showing the correct status of your node. If these two are not displaying “true” it means that your node is still syncing or is having some issues syncing. So is suggested to look into your LND logs or wait a bit longer.
- Block height and hash - shows the last block and hash that your node saw and synced.
E - Network Info
This section displays more details about the general status for the Lightning network, extracted from your graph sync data: number of public channels available, number of nodes, number of zombie channels (offline or dead), graph diameter, average and max out degree for the graph.
This information data could be useful to debug or just used for statistics.
F - Cashu Mints
In this secttion you can manage the ecash cashu mints you want to use for your cashu wallet. I willnot enter into too much technical details but here you have an excellent demo video about how to activate and use the cashu wallet.
G - Lightning Address
In this section the user could setup his own self-custody LN Address @zeuspay.com.
ZEUS PAY leverages user-generated preimage hashes, hodl invoices, and the Zaplocker Nostr attestation scheme to allow users who may not be online 24/7 to receive payments to a static lightning address. Users just need to log in to their ZEUS wallets within 24 hours to claim the payments, otherwise they will be returned to the sender.
If you activate the “persistent mode” all the payments to your LN Address will be instantly received.
Learn about how Zaplocker payments work and more about ZeusPay Fees here.
H - Swaps
This section is offering a simple integrated way to swap funds from your LN channels and cashu wallet out into any onchainn address (internal Zeus or external from any other wallet you want).
I - Onchain Addresses
In this section you could consult your generated onchain addresses for a better coin control
J - Contacts
A new contact book was introduced in Zeus v 0.8.0 that you can use to quickly send payments to your friends and family, also with the ability to import your contacts from Nostr.
Simply enter in your Nostr npub or human readable NIP-05 address, and ZEUS will query Nostr for all your contacts. From there you can send a quick payment to a contact, or import all or select contacts to your local contact book./<
Here is a short video how to configure and use your Zeus contacts:
K - Tools
Here we have various sub-sections with more tools:
- Accounts - here you can import external accounts / wallets, cold wallets, hot wallets, to control or use as external funding source for your Zeus node channels. This feature is still experimental.
-
Speed up transaction - This feature could be helpful when you have a stuck tx into mempool and want to bump the fee. You will need to provide the tx output from tx details and select the desired new fee you want to use. Must be higher then previous one and require you to have more funds available in your onchain wallet.
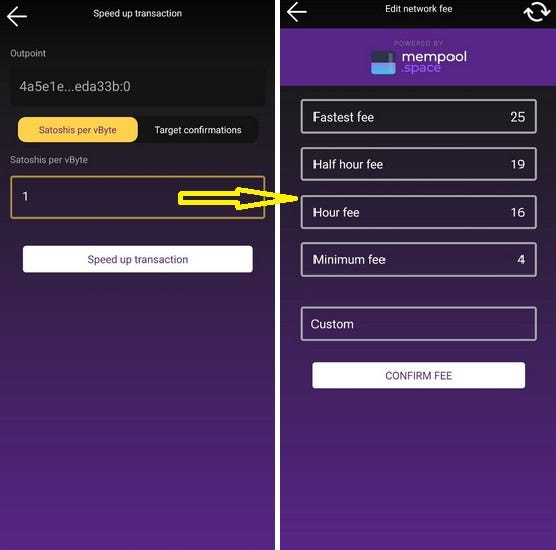
You have to go to your pending tx and copy the txID outpoint. Then come to this section and paste it, then select the new fee you want to use to bump it. It will popup a new screen with recommended fees in that moment, or you can set a custom one. Remember MUST be higher than previous one.
Is always better to keep a UTXO with a maximum 100k sats in your Zeus onchain wallet, to be able to use it to bump fees when is necessary.
- Sign or verify - With this feature you could sign a specific message with your wallet keys. Also can be used to verify a message to prove that is coming from a specific wallet keys.
- Currency converter - a simple tool to calculate the rate conversion between BTC and other fiat currencies.
L - Merch and Support
Here you will find more info and links about Zeus, online shop, sponsors, social media.
M - Help
In this last section you will find links to Zeus documentation page, Github issues (if you want to post a bug or request directly to app developers), email support.
STEP 2 - START USING ZEUS NODE #
Remember, Zeus is mainly to be used as a LN wallet, for easy and quick payments over LN. Sure, it also contain an onchain wallet, but that one should be used exclusively for opening / closing LN channels and not for regular payments of a coffee.
Please read my other guide about how to be your own bank using the 3 levels of stash.
In this moment the user have 2 ways to start using Zeus:
- Straight away over LN, using the 0-conf channel from Olympus LSP
- Deposit first in onchain wallet and then opening a normal LN channel with the peer you desire.
Method A - Using Olympus LSP
This is a very easy and straight forward way to onboard a new LN user with Zeus. It could be a totally new bitcoin user that have no sats whatsoever, onboarded by a friend, or a new merchant starting with his 1st LN payment.
By default, Zeus will use its own LSP, Olympus. But later you can switch also to other LSPs that support this 0-conf protocol to open channels.
By simply creating an invoice on your Zeus (put the amount and click “request” button), you will be able to receive those sats straight away.
The invoice you generate will be wrapped and you'll be presented with the fees associated with the service if they're paid. This wrapped invoice contain route hints towards your Zeus node, so the LSP could find your new node and open a channel with the new funds you are depositing.
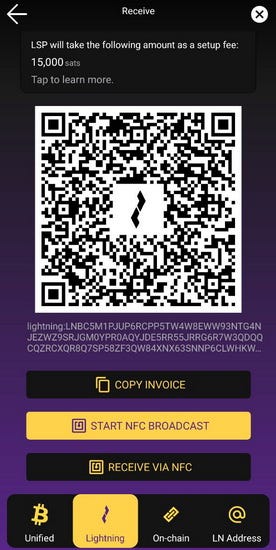
In order to get a LN channel from the LSP with the funds you want to receive 1st time, this invoice must be paid from another LN wallet and wait few moments until the LSP is opening the channel towards your Zeus node, deduct the fee and push the the remaining amount of the payment on your side of the channel.
All you have to do is pay the invoice generated for you in ZEUS with another lightning wallet, and you channel will open instantly. Please consult the Zeus LSP fees.
Another benefit of paying for a channel is zero fee routing. That means when routing payments, the first hop through OLYMPUS by ZEUS incurs no routing fees. Note, that hops beyond OLYMPUS by ZEUS will still charge you.
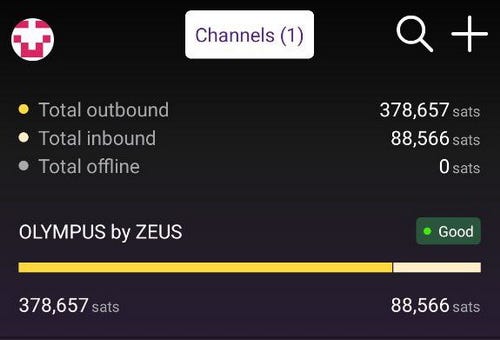
Once the channel is ready, click on the right button at the bottom of the screen, that displays the Zeus channels.

And you will see a channel like this, showing your side of the channel balance:
For more you will spend from this channel, more inbound liquidity you will have. For more sats you will receive into this channel, less inbound liquidity space you will have.
Here is a nice simple visual demonstration (by Rene Pickhardt) about how LN channels works:
In this moment, considering the demo screen for channels, click on the channel name and you will see more details about it.
You have a single channel with Olympus, of a total capacity of 490 000 sats, with a balance of 378k sats on your side and 88k sats on Olympus side. That means you could receive a maximum 88k sats more in the same channel.
If you need to receive more than 88k sats (the available inbound liquidity in this case), let’s say another 500k sats, by simply creating a new LN invoice with that amount, will trigger a new channel request to the Olympus LSP. So you will get a 2nd channel.
That’s why, in order to avoid paying more fees for opening multiple channels, it is recommended to open first time a bigger channel, let’s say 1-2M sats. Once is open, you could swap out to onchain part of those sats, let’s say 50%, using any external swap service described in this guide.
Once you swap out from that channel let’s say 50% and get back the sats into your own Zeus onchain wallet, you are ready to move to the next method of opening a new channel - from onchain balance.
Method B - Using your onchain balance
With this method you can open channels towards any other LN node, including the same Olympus LSP. But if you already have a channel with Olympus is recommended to have also with another node, for more reliability and also could use MPP (multi-part payment).
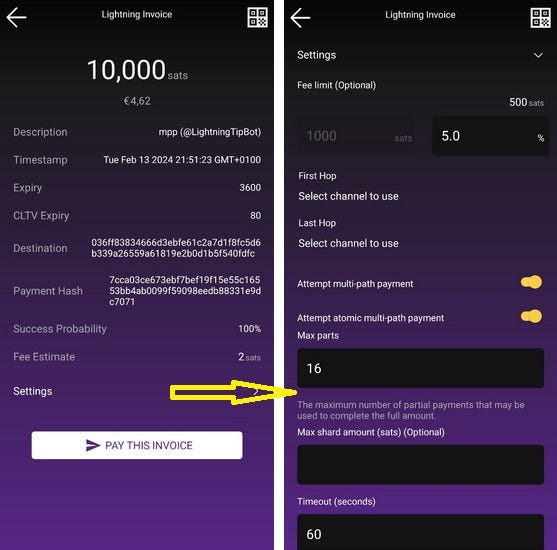
Above is an example of paying a LN invoice using MPP. As you can see at the bottom of the screen you have “settings” and is opening a drop down page with more details for the payment you are about to make. In that screen, if you have at least 2 channels open, the MPP feature will be ON by default. Also you can activate AMP (atomic multi-path) and set specific parts you want. This is a powerful feature!
For a private node as Zeus, I would recommend to have 2-3 good channels (max. 4-5), with good LSPs and good liquidity to cover all your needs to pay or receive sats over LN. See more LN node liquidity advice in this guide. Also here another general guide about LN liquidity from Bitcoin Design team.
Choosing the right peers, I know, is not an easy task, even for experienced users. So I will give you some options to start, these are peer nodes that I tested myself using Zeus (I tried to connect only to LND nodes to avoid incompatibility issues)
Here is also a list of vouched node peers for Zeus. If you know good ones, you are welcome to add them to that list.
You can open a channel in Zeus by going to the Channels view by clicking the channel icon in the bottom right corner of the main view, and then hitting the + icon in the top right corner.
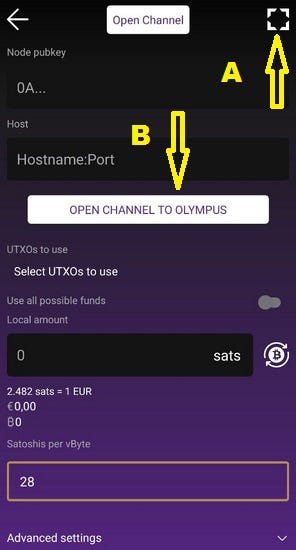
If you want to open a channel with a specific node, click on (A) top corner to scan the node QR nodeID (on Mempool, Amboss, 1ML you can obtain that QR) and all the peer details will be populated.
REMINDER
- Zeus embedded node do not use Tor service ! So please do not try to open channels with nodes that are under Tor! You are doing more damage to yourself than adding more privacy. Tor for LN it doesn’t offer more privacy but adding more trouble.
- choose wisely your peers, better be good LSPs, good routing nodes, not random pleb nodes that could close your channels and could not offer good liquidity. Here I wrote a dedicated guide about liquidity and example of nodes.
If you directly click on the button “Open Channel to Olympus” you will populate the required fields to open a channel to OLYMPUS by ZEUS.
Unlike paid LSP channels, your channel will require on-chain confirmation, using your onchain funds (you can select from your UTXOs in the open channel view); it will not open instantly. Please consult first the actual mempool fees and adjust them accordingly, depending on how fast you want to open that channel.
Before hitting the button to open the channel, slide down the advanced options:
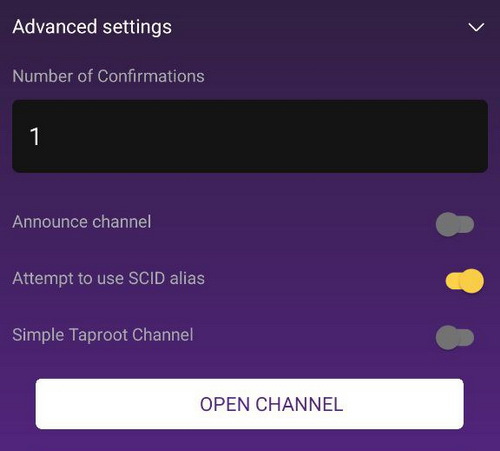
You will also need to make sure that the channel is un-announced (private). By default the option is off for announced channels. This option is not recommended to be activated for Zeus embedded node, is useful only when you use Zeus with your remote node, as a public routing node.
Unlike paid LSP channels, you will not benefit from zero fee routing by opening channels with this method.
And done, just click on the button “Open Channel”, wait for the tx to be confirmed by the miners. Once the channel is open you can transact as you wish with the sats from your channels.
Keep in mind that these channels will have all the balance on YOUR side, so you will not have inbound liquidity. As I said before, swap out or spend some sats buying stuff over LN to “make more space” to receive.
Think of your LN channels as a glass of water. You pour some water (sats) into an empty glass (your channel) until you fill it up. You cannot pour more water until you drink some (spending / swap out). When the glass is almost empty, pour more water (sats) into it by using a swap in. Read more about external swap services here.
There are also other LSP services as selling you inbound channels: LNBig or Bitrefill. I think are more services like these but can’t remember them right now.
So if you need practically an empty LN channel (the balance is 100% on the peer side from the start), for receiving more payments than you can handle on your existing filled up channels, this could be a very good option. You will pay a specific fee for opening these channels and you get plenty of inbound space.
Method C - Buying inbound channels from various well known LiSPs
LiSP = Liquidity Service Provider = offers only inbound channels and routing services
LnSP = Lightning Service Provider = offers LN wallets and services + inbound channels and routing services
This method require to have some other funds in a LN channel or another LN wallet, to be able to pay the opening fee from a LiSP.
Practically for a small fee you are buying an empty (on your side) LN channel, for the amount you choose. These LiSP channels usually have a certain time period of availability. After that the LiSP can close it at his discretion or offer the option to renew the channel lease.
Some of them could offer 0-fee routing base for all the payments made through this channel. Some others will charge extra fees.
Some could offer also wrapped invoices, that could add more privacy to your received sats.
Some could offer private and public channels, some could offer only public channels, so be careful the options you choose. Just for personal use, with few payments over LN, is not necessary a public channel. Public channels are only for commercial nodes that are doing public routing.
Here is a table with the actual main well known LiSP and their fees. Be aware that these opening fees could vary. I listed here an example for 1M channel size, but you can choose various size.
| LSP | Lease Fee | Chan size | Duration | Renew | Observation |
|---|---|---|---|---|---|
| Blocktank | 12,452 | 1M sats | 1yr | ? | |
| Olympus | 52,250 | 1M sats | 1yr | Yes | |
| Megalitic/Rizful | 20,282 | 1M sats | 1yr | ? | various nodes |
| FlashSats | 20,750 | 1M sats | 1yr | ? | |
| LQWD | 8,400 | 1M sats | 1yr | ? | various nodes |
| LNBig | 3,600 | 1M sats | 1yr | ? | various nodes |
| Acinq/Phoenix | 11,263 | 1M sats | 1yr | ? | |
| LNServer | 7,017 | 2M sats | 1yr | ? | various nodes |
| Bitrefill Thor | 25,000 | 1M sats | 1yr | ? | |
| Coincept | 11,300 | 1M sats | 1yr | ? |

TIPS AND TRICKS #
Inbound reserve limits
Right now, due to some LN code limitations it is not possible to receive exactly how much is displayed in “Inbound”. Always keep in mind that you should make your invoices with a slight less amount, respectively the “Channel Local Reserve” amount.

As you can see in the above image, the “inbound” it displays that I can still receive 5101 sats, but in fact in this moment is impossible to receive more. And you can observe that is the same amount as the “Local reserve”.
So keep in mind, when you make invoices to receive, also take a look into your channels liquidity and deduct the local reserve from that amount, if you want to push to the limits the receivable amount.
Quick advice for new users starting with Zeus node:
1. Seize correctly your new channels.
For example, if you know that you will receive in a week let's say 1M sats, open a 2M sats channel and swap out into onchain wallet or into another (temporary) custodial LN account 50-60% of your outbound liquidity. Always be prepared with more liquidity. Once you need more liquidity back in your Zeus channels, you can move it back from the custodial accounts.
If you know that you will send let's say 500k sats/week, then open a 1M sats channel. In this way you will still have a reserve until you fill it up again.
2. If you are a merchant and you will always receive more than you spend regularly, buy a dedicated inbound channel. Is the cheapest way. You pay a minimal fee and you get an "empty" channel.
3. Do not open small meaningless channels of 50-100-300-500k sats. You will fill them in matter of days, even if you use them only for zaps. Open bigger ones and different ones, NOT just one channel.
Once you open a bigger channel, you can always use external submarine swaps to move sats into your onchain wallets (including back to Zeus onchain). Keeping a balance between in and out liquidity is good and also you can “re-use” those sats to open more channels if you like.
Wrapped invoice
If you want to add more privacy when you receive, you could use the “wrapped invoice” method. Reminder: in order to be able to do this, you need a channel with Olympus LSP. Wrapped invoices will “hide” the final destination (your Zeus node) and displaying your LSP node as destination to the payer.
In order to obtain a wrapped invoice, go to the main keypad screen, put the amount and hit request. Will display a normal QR code for your invoice. Now, click on the top right “X” button and you will be redirected to more options for the invoice.
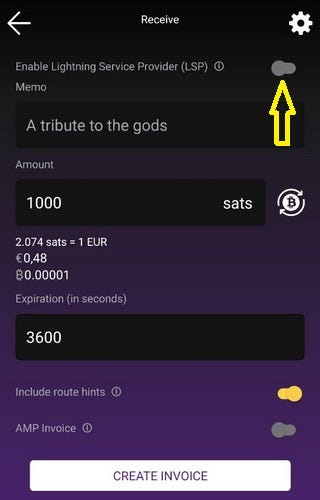
Now you will have to activate that option on top “Enable LSP” and hit the “Create invoice” button. That option will create the wrapped invoice and remember, will charge a small fee.
Invoices with route hints
This is a very useful feature if you want to manage multiple inbound channels liquidity. Practically you can indicate to which inbound channel you want to receive the sats from an invoice.
This feature it can be used also for circular rebalancing, when you want to move liquidity from one filled channel to another depleted one.
How to create an invoice with route hints?
- On the main screen, slide to the right the LN drawer and click on "Receive"
- In the invoice setup got to the bottom part and activate the button "Insert route hints", then select "Custom" tab. It will open a screen with all your available channels. Select the one you want to receive.
- Fill out all the other invoice details, amount, memo etc and click on "create invoice".
- Paying that invoice will bring the sats into the indicated channel.
If you want to pay to yourself that invoice (circular rebalancing), when you pay it from your same Zeus node, in the payment screen, select the outbound channel (one with more liquidity) you want to be used as sending payment.
Pay with Keysend
Keysend is a very underrated LN feature and users should use it more often.
Keysend allows users in the Lightning network to send payments to others , directly to their public key, as long as their node has public channels and has keysend enabled. Keysend does not require the payee to issue an invoice.
So how you can do that with Zeus?
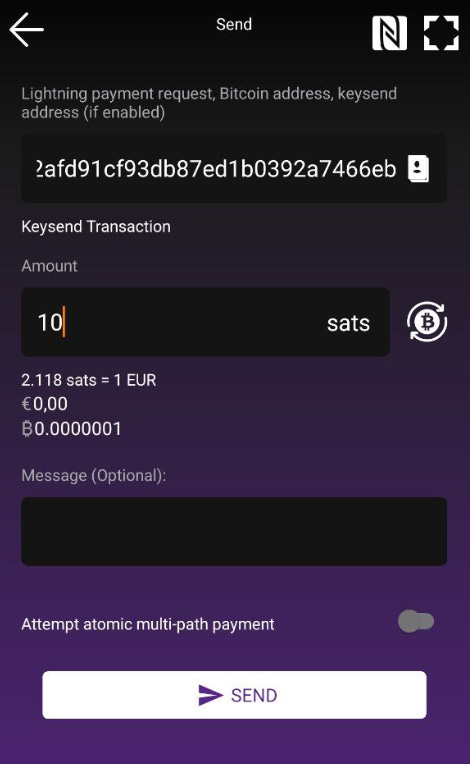
Simply scan or copy the destination nodeID (or use Zeus contacts to save your regular destination nodes as contacts) and then from main Zeus screen, click on “Send” button. In that screen then paste the nodeID or select from your contacts.
Put the amount of sats, a message if is necessary (yes, you can use it also as a secret chat over LN) and click on “Send” button. Done!
If you have a direct channel with the destination peer, will be NO fees involved.
If you do not have a direct channel with the destination peer, then the keysend payment will pay the fees as a normal LN invoice payment, routed on a regulat path as any other payment. Only that, remember, it will not remain any trace as a LN invoice.
I recommend to read the follow up guide Advanced usage of Zeus with more instructions and use cases. Another additional guide to read is about types of LN channels to be used with Zeus.
And… that’s it! From now on you just use Zeus Node as a regular BTC/LN wallet on your mobile. The UI is pretty straight forward and easy to use, intuitive for any type of user, I don’t think I have to enter in more details about how to make and receive payments.
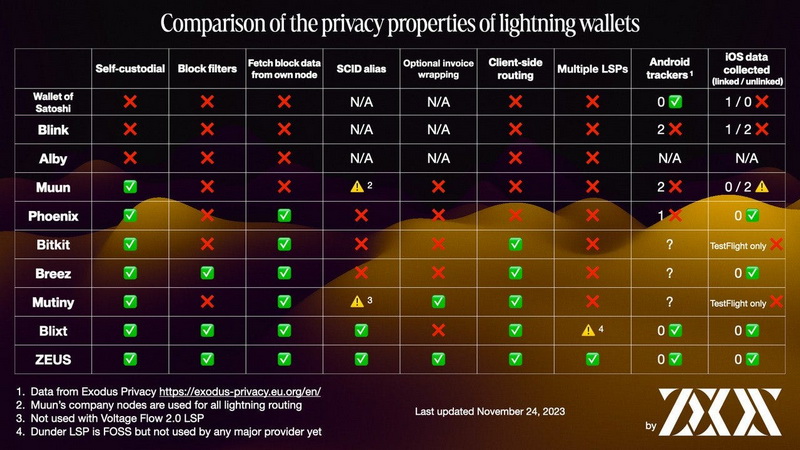
In conclusion, here is a comparison privacy chart :
Zeus Resources Links:
Website | Docs | Github | Releases | Telegram | NOSTR | Twix | Blog