How to use Zeus embedded LN node, opening channels, SHTF situations, migration to another devices, high fees environment, stuck opening channels, force closed channels, funds recovery

 |
|
 |
|
 |
|
 |
|
 |
|
 |
|
 |
|
 |
|
Updated Dec 01, 2025
In the previous guide, I wrote a presentation of new Zeus embedded LN node but being too large I couldn't add also these advanced steps for using it.
This guide is for advanced users and only for the SHTF cases, after you consult also with Zeus chat support. The guide was created after I put myself in the situation of a user, using Zeus embedded LN node and doing deliberately some mistakes, to find out solutions to fix the situations. This was reckless testing on mainnet !
I write this guide so YOU WILL NOT DO THESE MISTAKES or avoid them. I already spent a lot of sats in fees and force closing channels doing all these tests.
The guide contain 3 different scenarios:
- Getting started with opening channels
- Migrate your Zeus embedded node to another device
- Old device is dead, database is broken, Zeus node is not starting
- Disaster case - opening/closing channels with low fee
Maybe in the future we will have available the option to export / import the whole Zeus node data, without the need to close the LN channels, but right now is not possible this full recovery. I’ve tested this option but is more complicated (using Android adb tools with some CLI commands) and require some changes in Zeus code.
A - Getting started with opening channels
This is a general procedure, used as a regular method to obtain inbound and outbound liquidity for your new Zeus LN node. Many new users do not get it from the start so I will try to explain it step by step.
It is recommended also to read this important guide about LN liquidity.
Thanks to Renè Pickhardt, here is a shot video explaining how channels routing and liquidity works:
- Install the latest Zeus version, strongly recommend to use Obtainium and NOT from the app store. Please read this guide if you still considering to use an iPhone.
- Create a new Zeus embedded node in your new device
- Wait for it to fully sync. Go to Settings → Node Info and see if is synced to chain and synced to graph.
- At this stage, I recommend to prepare your Zeus node properly:
Set good neutrino peers. Test the default ones to see the ping response. Depending on your location, some of them will have a long time response. If the ping is higher than 150-200ms, you better remove it from the list and add good ones. Here is a list with worldwide neutrino peers. Make your own list based on the ping and select the option to use only peers from list, not random.
For US users, the default btcd.lnolymp.us should work fine.
For EU users, node.blixtwallet.com should have a good ping.
Or use your own Bitcoin node if you run one. You just have to activate Neutrino in your node and open the port 8333 in your router. No worry, nothing is leaked from your node, you are only delivering block filters to your Zeus. If you want you can share your neutrino node IP with other friends that are using Zeus too.
- Put Zeus in persistent mode. Go to Settings - Embedded - Advanced - select “persistent mode”. When you will start opening channels this option is very useful, because it will maintain the LND service alive and even if you close the app, the service is still running in background and will keep alive the connections.
- Activate EGS (express graph sync) and also activate reset EGS at startup. This could make a bit slow Zeus to start but you always have a fresh updated graph sync.
- Activate LSP, Default is https://0conf.lnolymp.us
- In the same screen, activate simple taproot channels. Later will be useful.
- Go to Settings → Invoice - click on top right option icon and select “Taproot type of address”. By default is segwit. Taproot is only optional if you want to open Simple Taproot Channels.
- Go to main screen, swipe to the right the onchain tab and click on receive. It will generate a new Taproot address.
- Let’s consider that you do not have any other funds in other LN wallets, only from onchain sources. Send to that address all the sats you want to use for opening channels. Put a decent fee, not too low and wait to have 6 confirmations.
- Once you have the funds confirmed, open your first channel to a well known node, LSP. Do not open with random unknown nodes, choose a good one, for example one from this list.
- Do not use all your funds ! Always leave an UTXO of like 50-100k for the anchors reserve. In case the mempool fees will increase drastically is better to have a reserve UTXO to be able to push the fees.
OPTION A - You need first more inbound liquidity
This is the option in case you want to use Zeus more for receiving (especially if you use LN Address zeuspay.com) so you will start with an “empty” channel or you can choose also how much you want to have as outbound liquidity.
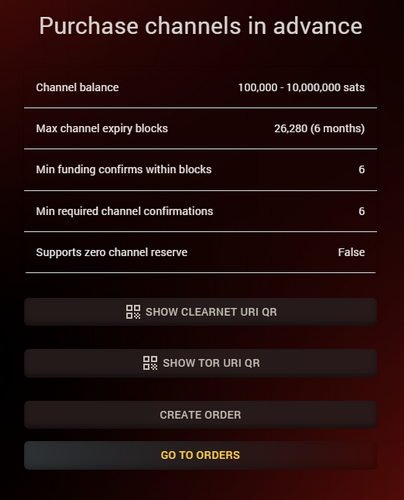
For this we can use the new LSP Olympus service to buy channels.

You can pay them over onchain or LN, with funds from the same Zeus wallet or any other wallet where you have funds. Then once is paid, Olympus LSP will open a channel towards your Zeus nodeID (see in Zeus Settings - Node ID) with the amounts you choose. Once you hit “Create Order” you can choose also if you want a private or public channel. For Zeus embedded nodes is better to stay on private.
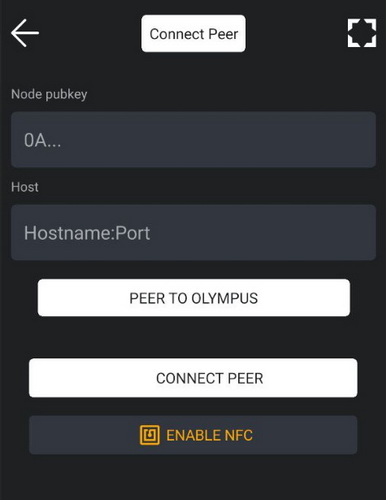
If this is your first channel and your Zeus never connected to Olympus, you should add first the Olympus node as LN peer.
Go to “Channels” screen and hit the “+” button from top right corner. It will open the modal screen to open a new channel. Now, click on the top button to switch to “Connect Peer” (see below image).

You can hit the button “peer to Olympus” or scan the QR code of Olympus node from any LN Explorer, to add its node pubkey into the form. Click connect peer and then go to finish the channel purchasing process.
During this process, is better to keep your Zeus online using the persistent LND mode (see in Settings - Embedded - Advanced settings).
Finish the purchasing channel process and done! In few moment your channel will be ready to receive. If you fill up that channel, you can always swap out from it like 50-80% using an external swap to onchain or moving to other temporary LN wallets until you need back that liquidity.
OPTION B - Advanced opening channels
Opening channels procedure. Let's consider that you will use 2.1M sats and you already moved them all to the new Zeus. And with these 2M sats you want to open 3 channels: Olympus, Blixt, Megalithic LSP.
- We start to open a 1M channel to Blixt node, or any other good node you want. I choose Blixt because I know is a LND node and also is supporting Simple Taproot Channels. You can set that in the opening channel screen, in “Advanced options”.
- Wait for the channel to confirm and also to have the new UTXO ready (6 conf).
Swap out like (50%) 500k to Blink / Rizful / CoinOS / Walletano / Sats.Mobi / a friend LNbits / BTCpay instance or LNDHUB account or whatever other simple custodial (non-KYC) temporary LN account.
Why a custodial for this phase? Because it’s easier and faster, without bothering with channels liquidity, swaps etc, you just need a temporary repository.
It could be in small batches or all at once, but must be all into same destination. The idea is to reuse part of the sats from already opened channels to open a new channel with Olympus LSP.
- Now, with the rest of 1M sats you still have in your Zeus onchain wallet, open another channel to Voltage or any other good node that accept private channels, see examples here.
- Repeat the step from point 13, until you will have almost 1M sats in a temporary LN custodial account (or any other LN wallet you have).
Once you got around 1M sats into the temporary LN account, open 1M channel with Olympus LSP.
How to do that? Simply, hit the receive button from Zeus main screen and put 1M sats. It will appear a message on top, that “this transaction will use the LSP and will incur some fees” (around 10k sats).
- Pay that generated invoice from your temporary LN custodial account. It will be paid to Olympus LSP and the LSP will open a channel towards your Zeus node, pushing all the sats into your side. Will deduct the fee from the total amount you've sent, but also will give you a plus of 100k inbound liquidity, so your channel will be in total 1,1M sats with 990k sats on your side, ready to be spend.
Now you have 3 nice channels, one with 1M outbound liquidity, 2 with 500k inbound and outbound liquidity. So you are ready for sending and receiving.
Why 3 channels with different peers?
- you want reliability, if one peer goes offline or have issues or high fees you can always use alternative routes.
- you can use MPP (multi-part payment), that means your payment can be sent (using the option MPP in the payment screen), through multiple channels, with smaller parts. This could help if the route couldn’t not find a path with enough large liquidity and could take with smaller parts.
- MPP is also good for more privacy in a payment.
- If one channel get almost depleted, you can still have the other two alternatives.
Do the channels backup !
Now is time to make a full backup of your node. Every time you open or close a channel is recommended to do a full backup.
Go to Settings - Embedded node - Disaster recovery.
- be sure the automatic backups are enabled
- do also an export of the data into clipboard. This will create a special encrypted string. Copy it into an external file and keep it safe. This is your LN channels backup that could be used later to recover your funds from LN channels.
- do also the backup to Olympus server. That will keep a copy of this string to the LSP server. It also can be used to recover in case you lost your personal file.
Done. Additionally if you want some more inbound in your new Olympus channel, just move out into the temporary LN accounts or any other external swap services (swapping out into your own onchain addresses), with the amount you expect to receive through this channel. For example if you use the LN Address provided by Zeus (zeuspay.com) you will need some inbound liquidity into this channel with Olympus.

B - Migrate Zeus LN node to a new device
This procedure will require closing old channels.
Zeus is not yet supporting a full migration of an existing node with open channels.
This feature will come soon to Zeus (maybe in v0.13), after LND team will introduce migration db to SQLlite and have an easy way to backup the channels.db in order to me migrated.
So until then, I would suggest the following steps:
- On the new device, install and create a new Zeus embedded node, save the seed and also note your nodeID.
- Go to channels and buy an inbound channel from Olympus LSP. Set the amount of the channel according to how many sats you want to move from your old Zeus node + 10-25% more
- From the old Zeus node, with online channels, pay the LSP invoice in the new Zeus. In few moments the new channel will be ready to receive the sats from your old node.
- In the new Zeus, create an invoice for the amount you have have available in your old Zeus channels. Keep in mind that you will not be able to send absolutely all sats, due the limits of channel buffer. Always send like max 90-95% and then after few minutes send the again a 90% of the remaining balance. Keep also in mind that when you close the channels you will get back in onchain the channels reserve sats, so is not really necessary to empty 100% your channels. I would recommend also to have at least 1UTXO in your old Zeus onchain wallet, that will be used as anchor reserves, in case the fees are spiking and be able to pay the closing tx.
- Go to your old Zeus node and pay that sweeping channels invoice to the new Zeus node.
- Now you can start the cooperatively closing channels operation. Do not do force closing! Put your old Zeus node in persistent mode before you start the closing operation tot avoid any possible inconvenient during the closing. The persistent mode is keeping the LND service alive even if you close the app.
- Once the channels are closed and funds coming back to your onchain wallet, you can move them to your new Zeus node, in one UTXO and keep that one as anchor channel reserve. Optional, when you close the channels you can indicate an onchain address of the new Zeus node but is more complex step if you do not know exactly what are you doing.
- Now you can remove your old Zeus app from the old device.
In this way you start fresh with a new nodeID and a smooth transition to a new device. Sometimes is better to start fresh.

C - Old device or node is dead
Let's say you had some problems with syncing, channels got force closed, database corrupted, app not responding correctly etc. Shit can happen all the time and in some situations is better to start over, clean, fresh. In any case, before doing these steps, consult with the devs and more experienced users in the Zeus Telegram group. In order to be sure that nothing else can be done, is better to have a second opinion for a correct diagnostic of your problems.
We suppose you already have backup the seed and the channels backup string. We suppose that you cannot coop close the existing channels, database is corrupted or the device is dead, app cannot be open or function properly anymore.
So uninstall Zeus, completely and install it fresh, new, latest version.
- Open Zeus and in the screen of creating a new node, but select RESTORE.
- Insert your 24 words seed and also paste the backup channels string.
- Wait patiently to fully sync and do the recovery process ! It will take several minutes.
- Try to keep the app alive as much as you can, at least in the initial phase of closing the channels. In this moment you cannot activate the persistent mode because it will require to restart the app and you do not want that to happen in the recovery process. In the future versions this persistent mode will be ON by default for the recovery process.
- Optional you can go and set better neutrino peers, that do not require to restart, but could help with keeping alive the sync with good peers. See previous scenario A point 7.
- Go to Channels screen (from main screen, bottom right icon) and switch the central button to "closed / pending” channels. You will see there in few moments that was initiated the force closure of the old channels. Optional you can monitor their closing in mempool.space using the closing txid.
- In case the channels were closed with a low fee (this could happen sometimes, due to high fees fluctuation and the LND fee estimator didn’t take the right one), you can import your old Zeus seed into Sparrow (see here the instructions) and from Sparrow you bump the fee with CPFP (Child Pay For Parent). Otherwise just wait patiently for channels to be closed. IT COULD TAKE TIME ! Don't freak out, is normal. If there were pending HTLC from previous channels, it could take even 144 blocks or more.
- Once you have all channels closed and funds back to onchain wallet (also checking in Sparrow that all funds are confirmed) you can uninstall Zeus and start fresh, proceeding with the instructions from the previous scenario A “Getting started with opening channels”. Is much better to start with new set of keys and nodeID, database etc.
D - DISASTER CASE - You open a channel with very low fee and is stuck in limbo
DO NOT DO RBF ON PENDING OPENING CHANNELS! DO ONLY CPFP or better use Mempool Accelerator.
In case you got a zombie channel, that cannot be opened or closed normaly from node UI, you will have to proceed with using the LND chantools. Please read carefully all the scenarios presented in that guide and choose the one that is appropriate for your case.
How I end up testing a disaster case? Read here so you can avoid my mistakes.
Here are the most common used cases:
So you open a channel and accidentally took a too low fee like 1sat/vb and also you used all the funds, with nothing left to bump the fee.
Now your opening channels is in limbo until the fee can be bumped.
What options do you have?
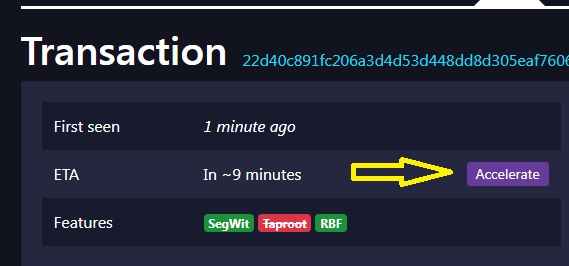
Best option - Use Mempool Accelerator tool, is fast, convenient and you can pay over LN, keeping the same txid and do not complicate things.

Open your opening tx in mempool.space page and click on "Accelerate" button If you already have another remaining UTXO in your onchain wallet use the Zeus option from Menu --> Tools --> Speed up transaction
Insert the tx output that looks like "d0d3bfd9cb6aa167c691140e5477...long-string:0" put the new fee and click to speed up.
Add a new UTXO to your onchain wallet. It is recommended to always keep a max 100k sats UTXO for this cases, with which you can easily bump the tx using CPFP.
If this is a channel open and there's only one output (no change), then you can't bump it with CPFP. You either have to use a 3rd party accelerator or pull the funds into Sparrow and craft a replacement transaction with CPFP method, have it settle, then open the channel at the appropriate fee rate
REMEMBER: DO NOT DO RBF, USE ONLY CPFP METHOD ! Otherwiswe you can end up with a zombie channel.
What is CPFP transaction?
Here is a simple video explaining CPFP - "Child Pay For Parent" transaction
Here is a video tutorial how to use CPFP with Sparrow wallet
EXTRA SITUATION - Using Zeus embedded node and you accidentally did an RBF and now the channel is in a zombie state, not opening
For this case you would need to extract the channel.db from your mobile device into a PC and proceed with ChanTools recovering method for zombie channels.
How to extract channel.db from a mobile:
This is not a very complicated procedure but require some basic knowledge of command line.
Be aware that the file channel.db could be quite big up to 2-4GB sometimes, depending on your previous activity. This file contain all your node data and activity and also the info about your wallet keys.
Steps to do:
- Install on a PC the ADB Tools and your mobile device drivers. Here you have more instructions about this step.
- Once you connect your mobile to the PC with a USB cable, type in the PC terminal these commands:
    adb devices
    #It will display your device that is connected
    adb root
    #restart and confirm the access to root on the device
    adb shell
    #to give you access to the hidden files
Now you are ready to copy the channel.db file on your mobile local storage or mSD card.
cp /data/media/0/Download/zeus/graph/channel.db /data/user/0/app.zeusln.zeus/files/data/graph/mainnet/channel.dbThis will copy the channl.db to your device mSD card or local media storage. From there copy it to your PC, over WiFi or through USB cable switching to transfer media method.
- Proceed and read carefully the instructions from ChanTools zombie recovering method. I suggest to construct all the commands into a text file and later execute them in the ChanTool terminal screen. You will need also to be in contact with the peer you opened the channel so they can do the same on their side.
I hope this complex guide will save you sats and days struggling to recover your dead node but most importantly to AVOID end up in this situation (if you read this guide BEFORE doing any stupid thing).
Zeus Resources Links:
Website | Docs | Github | Releases | Telegram | NOSTR | Twix | Blog